Sunday 26 April 2020

Early WWII - Polish vs. Germans Game 1 part 7

Game turns 4-6

In turns 1 to 3 the game was generally balanced, with little ground lost or gained and casualties stared to mount up. In turn 4-6 though the battle moved away from the static front line as the Germans re-deploy past the main line of battle. The Battle now turned in to two main areas, The hotly contested town and the still held embattled Polish Centre.

Seeing the battle start to turn in the Polish favour the German command began to press on forwards to the Town. The decision to leave behind the slower moving support infantry was not made lightly but Polish forces were massing around the town and surrounded defenders needed support.
Prille in the South abandoned his fruitless assault on the farm and moved directly to the south west side of town, this timely intervention helped Fressner's force that was about to be overwhelmed by cavalry.
Lindermann after his earlier difficulties made a uninterrupted drive for the western side of town. The remaining Panzer company took up good supporting positions, giving fire support to Fressner who was facing the cavalry
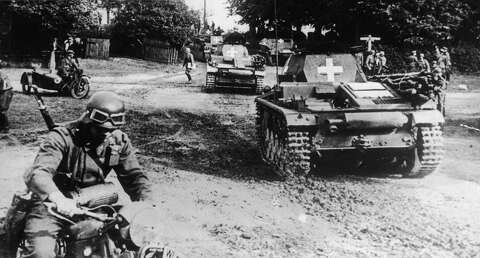
Von Bock made his advance to the North west side of town, leaving his infantry behind to cover against the still active Polish force of Rysard. His Panzers made into range of Polish forces attack the town from the east.
Linderman arrives to the West of the town to give effective fire on the Polish cavalry
After being repelled at the Farm, Prille's Panzers dive headlong into the Polish cavalry's flank
Von Bock uses his infantry to keep Ryszard's forces from flanking the Panzers as he pushes on to the town.
The Town
On the East side of town Zubic's mixed armoured and infantry formation finally deployed and wasted no time. With tanks moving to try to hold off Von Bocks Panzers in the Northwest the Polish Infatry threw them selves at the town. Supported by Worjcich's artillery they attacked the town twice. Despite desperate close combat with bayonets and grenades both assaults managed a tenuous foothold in the town suffering heavy losses. The Polish 7tp tanks exchanged fire with the Panzer IIIs and IVs but neither formation could land any telling shots at long range.
Zubic's mixed formation assaults the town.

At long range the 7tp and Panzers could not make accurate or telling hits on each other
Worjcich's 75mm field guns provided much needed artillery support for the assault on the town.

South of the town
Rogalski's cavalry had earlier in the day started well, making good progress in their advance. Taking the towns defenders and their commanders by surprise. With the arrival of Prille and Lindermann's Panzers though the tide started to turn. The cavalry found an ever worsening situation, as fire from their front and western flanks intensified. The Panzers landed telling, accurate and continuous fire. Within half an hour the entire battalion was reduced to only two active platoons of cavalrymen. Rogalski's charge was over and his forces played no more part in the fighting.

Rogalski's force is flanked by Prille's Panzers, casualties soon mount.
Rogalski's charge is finished and is now a romanticised myth of the early days of WWII. When Polish cavalry charged Panzers!
With the Polish cavalry nutrallised, Schorner and Fressner managed to hold the East side of town and the main Polish force was spent. At the farm in the south the once embattled Mateusz's Company could not react fast enough to the Panzers re-deployment round their position and had no further impact on the battle after that.

The Centre
As the battle for the town raged on. In western centre of the line Rendulic's re-enforced Kradshutzen company was still locked in and deadly battle with Radoslaws infantry company. The Polish forces in the woods made life hell on the Germans, every attempt to break away from the contact and get their fuel trucks to the town was met with withering fire. Rendulic's situation was so bad that he was reduces to just one Infantry platoon and one field gun battery from his entire re-enforced company. Polish resistance was furious and unrelenting as Radoslaw reaped a heavy toll on the German Kradschutzen.
Rendulic orders his forces to assault the woods!
Radoslaw's company rout the German attack causing heavy losses.
What the map looked like by the end of the battle.
forces at the end of the battle.


So the Battle for Poludnie Tercza is over. Hard fought with lots of ups and downs. Players familiar with blitzkrieg commander will know all to well the frustration an joy this game brings. This battle report took me 2 days to make and play. As you can imagine writing down a blow blow account took up so much time. The battle and commanders are not historically accurate as such but I think I captured the spirit and theme of the early war. YES I am aware of the lack of German air support but decided against it as I have not got any nice Stuka models yet.
As for the mission, well, the German plan worked and Polish plan did not. In the first three turns it looked like the Poles were set to change history and pull off a spectacular win but the fortunes of war are fickle. Once the Germans put a few good commands together the Polish forces were outmaneuvered then outgunned. The Polish front line held up well and in general made life hard for the German advance.

German Objectives
Hold town: Yes = 5vpts
Re-fuel Recce battalion: No = 0pts
KO Polish Forces: Yes = 14vpts

German Losses:
x8 Rifle Platoons
x2 Machinegun Platoons
x1 Assault Pioneer Platoon
x1 Panzer II Platoon
x1 Panzer III Platoon
x1 Recce Motorcycle Platoon

Polish Objectives:
Re-capture town: No = 0vpts
Stop German advance till turn 5: No = 0vpts
KO German Tanks: Yes = 4vpts

Polish Losses:
x7 Cavalry Platoons
x5 Rifle Platoons
x1 Mortar Platoon
x1 Anti-tank gun Platoon

I did enjoy doing it though an will no doubt do something like it later. I hope you enjoyed it.

Early WWII - Polish vs. Germans Game 1 part 5

Cunning Plans!

The Germans
Most of the German Mission revolves around connecting up with the surrounded forces in the Town. Holding the Town and generally damaging the Polish forces in the area.
So with that in mind Here is my plan
Deploy Rendulic's Kradschutzen right in the Centre of the Table and make every effort to get them to the town. They are the fastest forces I have. They will also have the honour of make sure the Trucks come to no harm (I will use Three Portze truck for the Fuel vehicles)

Use my three other Panzer companies (Von Bock, Lindermann and Prille) to probe the Polish front line and hopefully push through. If I get stuck then try to move round the slower infantry formations. Even though Schorner is out of Fuel he will be mounting a active defense and make sure to conserve his own forces while eroding the Polish ones.

Plan A
Pretty basic plan, keep it simple!
German Plan B?
Not sure... wing it and hope?

Polish Plans. A, B and C!
These plans hope that 2 things happen, 1 My Tanks actually arrive to aid the recapture of the town and 2 My Strung out Infantry Companies can hold off the Panzers. Mateusz holds the Farm in the South, Radoslaw the Centre and Ryszard the North. Zubic and Worjcich Both attack the Town from the East, combined infantry, armour and artillery should be sufficient to move the Germans out! Rogalski's elite Cavalry force sweeps in form the South East to finish the job and then whats left take on all comers!
Mix of Luck and Skill for this one!

How they deployed

Polish Forces.
Radoslaw in the Centre, this Company has a Anti-tank gun platoon attached

Mateusz in the Farm to the South with Mortar Platoon hidden in the corn fields

Ryszard to the North, backed up by another Mortar platoon

Germans

West side of Town. No dancing knife fighting here, just Germans!

East side of the Town. Recce battalion ready to hold out

Next time...

Turns 1-3 and all the Excitement that entails!

See you soon. 

Early WWII - Polish vs. Germans Game 1 part 4

Rules and the Table

Rules changes:
I have deliberately ignored the Limits on Recce units. they are all attached to their own respective command unit and may only use the Recce rule for that said command unit. 

Since I'm playing myself in this one I have wont be able to rely on any underhand tricky plans. But to keep it fair Ive come up with a crib sheet to use when I am not the "Player" this will keep things fair as In this game your turn may be interrupted by enemy fire!

Opportunity fire!
Opportunity fire represents the opposing forces taking a chance to shoot at you! Now normally this would be decided by the opposing player. This allows the opposing player to shoot at your forces if they move or shoot at them, the must be in range naturally and be able to damage what they are shooting at. However since I am that player too I have come up with this system to keep it fair and a bit random.

So when I am the "Player" I roll a 6 sided dice to see if I trigger a Opportunity Fire from the Opposing player. As the "Player" the more things I do and where I do them will increase the likelihood of the Opportunity Fire being triggered. As shown below in some cases it will be an automatic reaction. E.g. If a Tank was within half range and side or rear on to an Anti-tank gun platoon they would almost certainly take the shot (as no better one would ever happen) and so it is Automatic for this game.

Reaction to Movement:
Roll per enemy activation
Infantry/guns/soft vehicles
Recce/Armoured Recce.
Armoured Targets
In Range?
3+
6+
4+
Half range?
2+
5+
3+
Half Range and Flank/Rear shot?
Auto yes
NA*
Auto yes


Reaction to Shooting:
Roll per enemy activation
Infantry/guns/soft vehicles
Recce/Armoured Recce
Armoured Targets
In range in OPEN
4+
6+
4+
In range in COVER
5+
6+
5+
In half range OPEN
3+
6+
4+
In half range COVER
4+
6+
4+
Half Range Flank/Rear OPEN
2+
NA*
2+
Half Range Flank/Rear COVER
4+
NA*
3+
  * Recce Units have no Flank or Rear.

The Table:
Looking North to South on the Town of Polundnie Tercza and its surrounding area.

The Town of Poludnie Terzca

The Farm is surrounded by fields and good water sources for the livestock

So next, I will be going it to Battle Plans and Deployment

See you Next time.

Early WWII - Polish vs. Germans Game 1 part 3

I will detail this order of battle for both and any extra little rules that apply to the various units.  For these lists I have mad up fictional commanders and locations.

Polish Forces:

Special Rules.
Penny Packets. All Polish Tanks must be allocated to Infantry Formations and as such those formations are at a -1 to their Command Value for the rest of the Game.

Polish Forces on the Table: This represents the Polish front line and as such are roughly deployed in the centre line of the table. As they are essential to stop any further German Penetration of the line they unlikely to help with the fighting in the town.

A: 1st Infantry Company
Headquarters: Captain Mateusz (Command Value 7)
X1Wz.34 Recce Armoured Car
X3 Infantry Platoons (2 with Anti-tank rifles)
X1 Machinegun Platoon
X1 Mortar Platoon

B: 2nd Infantry Company
Headquarters: Captain Ryszard (Command Value 7)
X1 Recce Platoon
X3 Infantry Platoons (2 with Anti-tank rifles)
X1 Machinegun Platoon
X1 Mortar Platoon

C: 3rd Infantry Company
Headquarters: Captain Radoslaw (Command Value 7)
X1 Recce Platoon
X3 Infantry Platoons (2 with Anti-tank rifles
X1 Machinegun Platoon
X1 37mm Anti-tank gun Platoon

Polish Forces deploying via Mobile Deployment from Reserve. This Force has the Army Commanding Officer for the Polish. This represents the limited forces available for the Polish counter attack. The Army Commander is a High-Ranking artillery officer.

A: Artillery Company
Army Commanding Officer: Colonel Worjcich (Command Value 8)
X3 Infantry Platoons
X3 75mm Field guns (with trucks)
X1 Recce Wz.34 Armoured Car

B: Under-strength Infantry Battalion + Attached Tank Company
Headquarters Major Zubic (Command Value 8)
X1 Wz.29 Armoured Car
X5 Infantry Platoons
X3 7Tp tanks

C: Cavalry Battalion
Headquarters Major Rogalski (Command Value 8)
Recce Platoon (cavalry)
X9 Veteran Infantry Platoons (mounted cavalry 3 with Anti-tank rifles)

Break Point: 17

So, the Polish forces are roughly split into two parts, the static defensive line of the on-table Infantry formations and the faster counter attack force that will be deployed trying to recapture the town.

Next. The table, deployment and the whiteboard I will use to try and track everything.

See you soon

Dave

Early WWII - Polish vs. Germans - Game 1 part 2

First a look at the opposing forces, I will detail this order of battle for both and any extra little rules that apply to the various units.  For these lists I have mad up fictional commanders and locations.

Germans:

Recon forces in the town of Poludnie Tercza.

This force represents the Recon Battalion that captured and now must hold the Town of Poludnie Tercza. All of the vehicles will not be allowed to move during the game and they have ran out of fuel. Once deployed that is where thy must stay for the rest of the game.

Front to back - Left to Right
Headquarters - Major Schorner (Command Value 9)
x7 Heer Rifle Platoons
x1 Machinegun Platoon
x1 Assault Pioneer Platoon
x1 Recce Platoon with Motorcycles.
x1 Sdkfz251
x2 Trucks
x1 Field car

German Forces being deployed via mobile deployment west of the town.

A: Commanding Officer: Panzer Battalion
Oberstleutnant Fressner (Command Value 9)

B: Kradschutzen Company + Support
Headquarters - Hauptmann Rendulic
Recce Sqaud with Motorcycles
X3 Kradschutzen Platoons
X1 75mm Field gun Platoon (and Horsh trucks)
X2 Heer Rifle Platoons (with trucks)

C: Panzer Company 1
Headquarters - Hauptmann Von Bock (Command Value 9)
X1 Sdkfz222 Recce armoured car
X2 Heer Motorised Rifle Platoons (Trucks)
X1 Panzer I
X1 Panzer III
X1 Panzer IV
X1 Mortar Platoon (Field car)

D: Panzer Company 2
Headquarters Hauptmann Linderman (command Value 9)
X1 Sdkfz 231 (6RAD) Armoured Car
X2 Heer Motorised Rifle Platoons (Trucks)
X1 Panzer IV
X2 Panzer III
X1 Machinegun Platoon (Field car)

E: Panzer Company 3 (reserve force)
Headquarters Hauptmann Prille (command value 8)
X1 Sdkfz 222 Armoured Car
X2 Heer Mortorised Rifle Platoons (Trucks)
X1 Panzer I
X2 Panzer II
X1 Machinegun Platoon (Field car)

Break point: 15

So that's the German Forces Available. Definitely the emphasis is on mobility, with high command values and small unit sizes this force should be mobile and pack enough of a punch to fight through most opposition. 

Next up. The Polish forces

See you next time.

Dave


Early WWII Poilsh vs.Germans - Game 1 part 1

Ok so I have had an idea!

One Man Wargame!

I know there are a lot of people out there who have done this before, I did not say it was a new or good idea. But I do love a bit of Blitzkrieg Commander, this rule set is a fairly easy to grasp grand scale game. All of my Miniatures are from  Pendraken, terrain is a mix of N gauge railway and things that I have made myself.
https://pendraken.co.uk/

I must admit that playing a game against myself is going to be tricky, the turn sequence of BKCII may trip me up a little but I am confident I can do this.
In this First part I will detail the mission, forces available and some of the tools I will be using to keep me from going mad.
When I am the "player" I will be doing all in my ability to; A Follow the mission and B totally crush the enemy. I have come up with a sort of crib sheet that hopefully will represent enemy reactions to my turn and will apply it constantly to keep it even. None of the dice rolls will be fudged to create drama or false results. I will be completely honest with myself.

It is worth a mention that even tough they will be Nazi imagery (flags) in this battle report it is purely in a historical setting for accuracy and I naturally do not endorse their ideology or any other extremist views. If these things are likely offend you I suggest you do not follow the Battle report. 

Scale. 10mm (each stand of models roughly represents a platoon of men/vehicles or battery of guns.)

Nazi invasion of Poland to start WWII in 1939 - The Edwardsville ...
Setting:
German armoured forces sweep through the Polish border, the Luftwaffe flies overhead and destroys the Polish air force on the ground. Many forward elements of the Polish army are surrounded before they even receive orders and are quickly overwhelmed. Slowly the Polish army gathers to attempt a counter attack but every time this is attempted, German air and ground units attack causing confusion and destruction.

Scenario:
A strong German Recon Battalion has made its way through a hole in the jumbled Polish front line, they have run out of fuel and are awaiting re-enforcement from the rest of the Panzer Division. Whith what appears to be a miracle unfolding Polish forces are in a position to not only hold this German thrust but recapture a town and potentially turn the battle in their favour. Not wanting to suffer any setbacks the German forces want to not only force a battalion through the gap but the entire division.

Missions:
German
1 Make sure the Town is held no more than 2 to 1 enemy forces in the Town Area by Turn 6 5vpts
2 Reach the Town by Turn 6 with at least 1fuel truck 5vpts (Fuel truck move once per round for free)
3 Destroy Polish forces in the Area 1vp per Polish units knocked out a the end of the game
Polish
1 Recapture the Town, make sure 0 German units are in the Town by turn 6 5vpts
2 Knock out German Panzers 2vpts per tank at the end of the game
3 Hold the German Forces until turn 5, making sure that German re-enforcement move further than the halfway line on the table. +5vpts

Special Rules:
All German forces must use the Mobile Deployment rules from turn 1 (those already in the Town are not affected by this)
Polish forces not on the Table Also must use the Mobile Deployment rules
The Town blocks line of sight, gives anyone in the town a 6+ cover save and counts as -1 to hit penalties. Units in the town may only be shot at if they are within 5cm of the edge. likewise they may not shoot out if they are not within the 5cm boarder.
Forests block line of sight
Crops block line of sight to ground units
Water/Swamps are impassable to Vehicles.

Game lasts 6 turns

Break point: see the Forces Roster.

Early WWII - Polish vs. Germans Game 1 part 6

Game: Turns 1-3

These opening turns will cover three parts of the battle; The Town, Centre/North and The Farm in the South. This is where the action has been thickest.

The Farm:
Polish company under Mateusz was tasked to hold the farm and secure the Southern flank of the front. Panzers and Motorised Infantry lead by Prille pressed forwards to Polish position. At first shooting was sporadic and ineffective from the Polish defenders but as the German infantry disembarked from their vehicles they were met with concentrated MG and Mortar fire from the farm buildings. Three Panzer platoons moved forwards to offer support in the attack but were themselves checked by dedicated Polish anti-tank rifle fire. German losses mounted up for little gain. A platoon of Panzer II tanks, a Rifle platoon and MG platoon were all knocked out of the battle. At this point in the engagement, the Polish holding the farm have only lost one Anti-tank rifle Platoon.

German forces are pushed back from the farm perimeter as the Poles lay the fire on thick

Despite attempting a flanking maneuver Polish MG, Mortar and AT rifles exact a heavy toll.

Centre and North
The Centre has seen perhaps the heaviest fighting in the early stages of the battle. Rendulic's Kradschutzen Compnay and its supporting elements made a direct drive for the town. These units were promptly halted by Radoslaw's Infantry company in the woods. The exposed Kradschutzen motorcycle soldiers took heavy fire, loosing their recon platoon early in the fight. After a pause they managed to deploy their support field gun battery and return fire with MGs, rifles and light howitzers. After some time of trading fire at long range Rendulic's MG platoon were cut down, leaving Radoslaw's compnay holding a strong position.

Linermann's Panzer company were intended to support the Kradschutzen but were delayed (for almost an hour) and lost one Rifle platoon before they arrived on the field to mines. As the German tanks moved forwards they took hits from a concealed AT gun platoon from Radoslaw's position in the centre. Despite deploying their Infantry and MG platoons to counter the guns a whole platoon of Panzer IIIs were shot up and disabled. Lindermann then came under fire from Polish elements of Ryszard's Company in the north, with effective long range MG fire knocking out the German support infantry and the MG platoon.

During this time Von Bock made the most progress and pressed the attack against Ryszard's company in the north. The Tanks and Infantry combined well and inflicted heavy losses on them. At one point the German Panzer Company almost encircled the Polsih defenders. Causing the Polish forces to almost rout as their commander tried to leave the battle. But a communications error caused Von Bock to withdraw effectively giving up all of his gained ground. This allowed the battered Ryszard breathing room and to rally support for his comrades in the centre. Even with 50% losses the Poles gave fire with the already noted effects on Lindermann's forces.
Rendulic's Kradschutzen make progress
Soon though, they are in a desperate battle, trading fire with Radoslaw's forces in the woods.
Despite being killed by MG and Rifle fire, Radoslaw's AT guns held on long enough to knock out a German Tank platoon.
Lindermann's bad start left him struggling in a deadly crossfire from Radoslaw and Ryszard's forces. His infantry support now gone and 1/3 of is tanks burning.
Von Bock's Panzers inflict heavy loses on the Polish infantry in the woods.

The Town
In the Town Schorner readied his Soldiers for a hard fight, the German Recon Battalion was short on fuel and sleep but occupied a good al-round defensive position they they would be loath to give up. In the distance Polish armoued forces could be herd but were not seen at any point in the fighting so far. The Polish Commanding Officer Worjcich ordered his Company forwards and his field guns deployed but delays to Zubic's armoured support had left him unwilling to commence any direct assualt on the town until he could mass tanks, infantry and artillery. On the east side of town limited exchanges between Polish and German infantry caused minor casualties.

In the South west, Rogalski's Cavalry battalion made no such hesitation, they advanced at pace to the town, covering the ground swiftly on horseback. Only when shooting from the town killed a leading cavalry platoon did they dismount and advance more cautiously. Seeing the Polish cavalry forces approaching the town the German Commanding Officer Fressner moved along the main road into the town and immediately assumed control of half of the weary defenders. His orders were at that point met with confusion and hesitation. Four platoons of riflemen left the town and attempted to attck the dismounting Polish force.
 
Rogalski's cavalry move up.
Reach the edge of the town and dismount
German forces press an ill timed attack from their positions.
 OK so a lot went on in that part 1 of the battle. The cruel fog of war and command mistakes. Plenty of action too.

See you next time for the exciting conclusion!